Monday, March 30, 2009

Haircuts and pixies, bushes and birds!... and a gator

Well, well. I neglected this here blog for a few days, and now I'm way behind on all of my sharing. :-) I'll speed-catch-you-up: Game Night was fabulous. And yes, I actually won a game. YAY for me. It doesn't happen all that often, really. Luckily I'm not a super competitive person, and I'm fairly comfortable with losing.

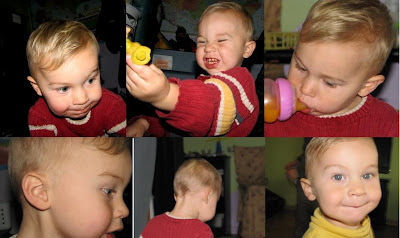
I can't leave out the biggest news. My "baby" got a haircut! Yes, it's actually his second haircut, but now he looks like he's been thrown into toddlerhood. He's no longer my baby!!! Look at the before:

And now after:

Oh goodness, someone splash some water on my face! Can it be? Then I realized today that The Artist was this age when Nature Man was born. And Dash was younger than this when I found out I was pregnant with Little Lad. I suppose this 2nd birthday of his (on Saturday) has snuck* up on me because I know he's the last one, and I assumed he'd always just stay the "Little Lad." Deep breathe.

On to other news. I used Mrs. Smiley's idea, with permission, to make my children into pixies. I also made some elf ones and fairies that I haven't put around yet.

This is my Ivy Angel...he is tending his poor neglected home. Let's hope the live-in help does this plant some good!
...and more mischievous little pixies, hanging out on my CS Lewis books, with lollipops in their mouths. I love this picture of my boys. See that look of adoration on Little Lad's face? He loves his big brother so much!!

The "nest picture" was inspired by the dear Nester. Bless you, Nester, for inspiring me to make my home more smile-inducing every day. I love that she posts things simply to inspire beauty and encourage creative thinking.

Hopefully I can do a little of the same. Even if your style isn't mine.

Even if you are a perfectionist (I am not.) Just copy anything you like. Leave the rest.

I also (finally) finished painting the TV table over the weekend, with a little help from the painting elves aka the kids. It is plain. Black. Glossy. Plain-- see?? Which is why I postponed it. But it's done, I like it, and it matches.

And a totally unrelated fact, that leads into my next subject. We saw a hawk today! When Little Lad spotted it, he screamed "HAWK, HAWK" at the top of his lungs until it flew away. Hmm... we may have to train him to zip those baby lips before we haul him back to the Eagle Watch! ;-)

AND my dah-ling husband bought me some blueberry bushes yesterday!! Really. That is awesome. Completely and fabulously wonderful, and such a surprise. He went to Lowe's (sorry, Ann-Marie) to get a new garbage disposal (don't ask) and came back with the bushes b/c the disposal was $20 less than we had budgeted! YAY!

Last but not least, we found an awesome new Nature Treasure this weekend. See it? Scary, huh? Ohhhhhh....we love it. Yes, we do. It's awesome. Look at the underside of the jaw? Fabulous. This was one of those oh-so-rare antique mall finds. I spotted it even before the boys did, which made me mighty giddy. It's always fun to drag them around the corner with anticipation and squeal "Look at THIS!" (Of course I checked the price before I showed it to them-- and I couldn't believe how cheap this baby was. Oh thank you, God, for caring about these little things!)

The bed beckons.
Night.

Okay, I'm a word nerd sometimes

*Usage note:
First recorded in writing toward the end of the 19th century in the United States, snuck has become in recent decades a standard variant past tense and past participle of the verb sneak: Bored by the lecture, he snuck out the side door. Snuck occurs frequently in fiction and in journalistic writing as well as on radio and television: In the darkness the sloop had snuck around the headland, out of firing range. It is not so common in highly formal or belletristic writing, where sneaked is more likely to occur. Snuck is the only spoken past tense and past participle for many younger and middle-aged persons of all educational levels in the U. S. and Canada. Snuck has occasionally been considered nonstandard, but it is so widely used by professional writers and educated speakers that it can no longer be so regarded

Radiation and chemo-- CT scan soon

My Mimi finished her radiation last Friday and her chemo today, so now we pray that her CT Scan will show good results. It is scheduled for Thursday, May 14 and they'll get the results on Monday, May 18.

Please stop and say a prayer for my Mimi. Thank you.

Thursday, March 26, 2009

Laying wood floors

Well, I've veered from my usual "cheap and easy" right now. We just finished laying wood flooring. Actually, it's laminate. Real wood would totally wipe us out, plus I seriously doubt we could keep it nice.

So, anyway, I'm absolutely thrilled that this was budgeted, saved for, and now it's become a realization. We had to downsize our original plan because of money (and the fact that I did not think I could work around that many doors!!)

I did the flooring about THREE times before getting it right. sigh. And then it turns out that it was NOT completely right. I did eventually have to call in reinforcements for the detail work at the ends and some installation/ cutting help. I just couldn't get it exactly right. I managed the regular transition between carpet and wood, but not the little tightest trim against the walls. Soooo, I'm happy. I learned a new trade, plus we asked for help when we actually needed it. The help we got didn't run us much over budget. If we'd had it all installed, it would have cost over $2 PER SQ FOOT!! Insane! Yes, I did have to get some help, but I did A LOT of it myself, and I'm still thrilled about that!!

Tips: line the panels up vertically. They will be staggered, so you'll cut the first and last pieces, and the total length of the vertical line will be the length of your room. Got it? Connect them (with your hammer thingie,) and THEN push the long vertical panel lines together, side by side. It took me three stinkin' times to figure that out!!! Oh, yes, I had some BREATHE, Wendy moments!!

(By the way, tomorrow, I'm doing this:


Click to learn more.)

Wednesday, March 25, 2009

sewing lessons and lid magnets

It's spring break for us. I hadn't intended to take the whole week off, but we're doing some major house stuff, so it's been necessary to use my time on that. The kids were remarkably good today (making up for bad attitudes yesterday perhaps?)

Earlier in the week, we did simple sewing lessons. First I let each of them make their own pillow slipcover. Measure pillow. Get double that length of material. Hem, sew ends together. Slip it over the pillow and you have yourself a new look. Plus you can make seasonal ones, or layer them. I add pockets to mine to store toys. Or the remote control, so it's not always lost between cushions.The artist chose a beautiful pink print that my uncle had sent.

Nature Man chose some bright flowered blue material. And Dash chose an almost glowing green fuzzy one. All perfect for their personalities.

You can see that Dash got distracted with the picture taking, and started making faces instead of paying attention to directions. ;-)

Then my artist made herself a cowboy print waist apron. YAY!!

Then we did simple lid magnets with some of our extra pictures.

Cut photo to fit. Glue in lid. Glue magnet on back. Done. Easy peasy. The pictures are of my mom, my Nature Man when he was just a little bitty man,

and one of me holding my artist baby.

Pictures of the BIG project tomorrow!!

Sunday, March 22, 2009

Risotto with Artichokes and Parmesan Cheese

This recipe comes from my friend Sam, who got it from Williams-Sonoma Italian Favorites.

Ingredients:

Juice of 1 lemon

4 large artichokes or about 20 small ones

2 T extra-virgin olive oil

2 cloves garlic, minced (I love my Pampered Chef food chopper)

1/2 c chopped fresh Italian parsley

2 1/2 c water

salt and freshly ground pepper

3 c Chicken Stock (I used organic chicken-base Better than Bouillon)

1 1/2 c Arborio rice

1/2 c grated Parmesan

1 lemon, cut into wedges

(Go ahead. Ask if you must use Arborio rice. Then read this article.)

Have ready a large bowl of water to which you have added half the lemon juice. Remove the stems and tough outer leaves from artichokes until you reach the pale green hearts. If using large artichokes, cut in half lengthwise, then scoop out the prickly chokes and discard. Cut the artichokes lengthwise into thin slices. As each is cut, place it in the bowl of water.

In a deep frying pan over medium heat, warm the olive oil. Add the onion and saute until softened, about 10 minutes. Add the garlic and half of the parsley and saute for 2 minutes. Drain artichokes and add to the pan along with 1/2 c water and large pinch of salt. Cover and cook over medium heat until the liquid evaporates, about 25 minutes.

Meanwhile, combine stock and 2 c water in a saucepan and bring to a boil. Reduce heat to achieve a gentle simmer and maintain over low heat.

Uncover the artichokes, add the rice, and stir for 2 minutes to coat. Add a ladleful of the simmering stock-water mixture and stir constantly over medium heat. When the liquid is almost absorbed, add another ladleful. Stir constantly to keep the rice from sticking and add more liquid, a ladleful at a time, when the previous ladleful is almost absorbed. The risotto is done when it is tender but slightly al dente and the center of each grain is no longer chalky, 20-25 minutes.

Remove from heat and stir in Parmesan and remaining parsley and lemon juice. Season to taste with salt and pepper. Serve with lemon wedges, if desired.

This got great ratings from my entire family!! Enjoy!

Friday, March 20, 2009

Homemade Something, just for fun

The first five people to respond to this post will get something made by me.

This offer does have some restrictions and limitations so please read carefully:

- What I create will be just for *you*
- I make no guarantees that you will like what I make. ;-) But I hope you will.
- It'll be done this year (2009).
- You have no clue what it's going to be. It will be something made in the real world and not something over the internet. The anticipation will be part of the fun....

Here's the fine print:

In return, all you need to do is post this text into a note of your own and make 5 things for 5 others. If that means sending out a mass email, and the first 5 people that respond get a gift, so be it. This is a "pay-it-forward" type-thing, obviously. :-)

Remind me that I have a fantastic recipe to share with you tomorrow!! I made it for dinner tonight, and it got 5 star ratings from ALL SIX of us!!!

Thursday, March 19, 2009

An Easter craft, and then we may get back to our regular programming.

We had to have all indoor study time today...which was hard for me and the kids, after the last two gorgeous days. It's this stupid Arkansas weather, constantly changing. Tempts with spring, and then drops 30 degrees. Sigh. It should be nice again before long, though.
The kids were having some difficulties focusing today, so we acted our Bible studies out.
("Got Crystal Light Fruit Punch?")
And then we started on our egg crafts.

Remove a top section. Poke a little hole in the bottom. Fill with soil. Poke down a seed or two. We used marigolds. Then water the plants and stick it somewhere cute. We put some in pots outside, some in a dish, etc. I'll take more pictures when they bloom.

Side note: The seeds will draw extra nutrients from the eggshells. Once the seedlings are about 3 inches tall, they are ready to be transplanted into the garden. Remove them from the shell before you put them in the ground. Then crush the eggshells and put them in your compost or plant them in your garden.

Other options, which we will do later: (1) Paint stripes or polka dots, etc on shells before you start with the soil; (2) Draw a face on, and plant grass seed in the top, to grow as hair; and my favorite (3) modge podge child's face to egg, and plant flowers or grass to grow!

Have fun!

Wednesday, March 18, 2009

Decorating outdoors

We interrupt this house-decorating set to bring you new ideas for fun times outdoors.

What can I say? When the weather is absolutely gorgeous, we work outside all day, eat outside, and then do our crafts/ painting outside in the late afternoon. Do you see a theme?

I finished up a bit on the porch first, with my trusty helpers doing the sides.


Then we painted the hopscotch. Actually, my days are blending together. We did this project yesterday afternoon.


I think Fred and I have been having as much fun with the hopscotch as the kids!! :-)


This afternoon I decided to paint a checkerboard on the wooden picnic table. As you can see, the kids were doing their "seat work" at the other picnic table at the time. I was nearby in case they had questions. No, I don't usually sit down.


(Just in case you are wondering, each square is 3 1/2 x 3 1/2 inches long. It was easy to do. Use a sealant and exterior paint. Tomorrow I'll spray over it with clear coat. I already had these things on hand, thanks to my mom's ample supply.)


When I told Nature Man that he could play checkers or chess on the board, he said that those plastic pieces were "too wimpy" and they would just blow away. Good point. So, when the table was dry, and the kids had their work done, they went dug up some "manly" checker pieces aka rocks. We painted the pieces gray and black, with crowns on one side, for when a piece gets kinged. Pretty nifty. They enjoyed playing with it this evening. :-) And if we lose a piece, we just dig up another rock to paint!


Hope everyone is enjoying this fantastic weather!! I wish it were 80 degrees every day!


Tuesday, March 17, 2009

Kitchen Part2

Simple Ideas first, and then we'll get to the big scary one last. :-)

Try hanging small wire baskets inside your lower cupboards to hold sponges, gloves, and liquid dish detergent. This way your sink and counters stay clean, but the things you need are still within reach when you need them. Cost: nothing, if you have any extra baskets laying around. And they don't have to be metal, of course. And if they are ugly baskets, you can just spray paint them. Easy as pie. :-)

Update the sink and hardware. You wouldn't believe how many cheap beautiful sinks and hardware I've seen at antique stores!! I haven't done this, but it can't be THAT hard. I'll find the instructions if anyone is interested.
Cost: $7 and up, and lots of elbow grease

Remember: "cleanies" hang things! Mount a magnetic strip to the wall for knives; just make sure it is out of reach of little hands. I think I'll hang mine inside a cupboard (out of sight, out of mind for the littles.) You can even add decoupaged paper over the board...looks pretty and still does the job. Or make one yourself, using large, strong magnets. Yes, you CAN do it. Cost: a few bucks, if you buy the magnets and do it yourself. Decoupage a door that leads into/ out of your kitchen. You know what they say about making a grand entrance, right?
Cost: nothing, if you already have some paper, maps, wallpaper (whatever you plan to use) and a decoupage glue.(Isn't my Nature Man's picture great?)


Last, but not least, there IS a way to paint over Laminate counter tops and/or vinyl floors!! This is quicker, easier, and cheaper than trying to recover with tile. Although I do love me some nice tile!
Aren't these pictures lovely and inspiring, from Kitchen and Bath Ideas?
My kitchen counter tops are blue. I picked them out myself before we moved in, about 6 years ago. Now I wish I'd gone with a marbled black, to coordinate with everything...I've redone my kitchen color scheme three times since then. Soooo, I just may try my hand at this eventually.


Materials to Buy

  • Trisodium phosphate (TSP) cleaner
  • Painter’s tape
  • Foam paint rollers
  • Tinted bonding primer
  • Water-based paint
  • Polyurethane

Tools to Gather

  • Wood glue
  • Drop cloths

Step 1: Prepare the surface.
Glue down any portions of laminate that might have come loose from the substrate. Clean the surface with TSP (trisodium phosphate) cleaner, following the manufacturer’s directions.

Step 2: Protect other surfaces.
Cover what you don’t want to paint with low-tack painter’s tape and drop cloths.

Step 3: Select primer.
Choose a quality bonding primer. Have the store tint the primer to suit the color of the base coat to come.

Step 4: Roll on primer.
Use a foam roller to apply the primer. Let dry according to the manufacturer’s directions.

Step 5: Roll on the base coat.
Use a foam roller to apply the base coat of color; let dry.

Step 6: Add a design.
Draw your design on the counter top. Protect areas you don’t want to paint with low-tack painter’s tape, and then use a foam roller or a brush to apply the contrasting color or colors for the design. You can also use stencils or stamps, or create a design freehand. (For lettering, such as the “his” and “hers” in this bathroom, use a stencil.) Let dry and remove the tape.

Step 7: Apply clear sealer.
Protect your handiwork with three or four coats of clear water-based polyurethane, letting each coat dry before applying another.

Cost: too much for me right now, but still WAY cheaper than the alternative, if you are planning to redo the counters anyway!


Ideas for the kitchen Part1

First, clear off the counters. Hang cups, bananas, etc from inside the cupboards, or from the bottom.
Clear away knick knacks... or at least group them tightly as a focal point,
rather than misc clutter.


Now, what can you do to make this a fun place to be? After all, we spend a great deal of time in the kitchen.

This is Sara Mincy's kitchen. I adore it. Truly. Just looking at the picture makes me smile. In fact, I was so inspired by her creativity and use of color that I copied her. Imitation is the purest form of flattery, right? I now have bright lanterns hanging in my dining area as well.

Try vinyl.Vinyl can be purchased cheaply on eBay.

Don't overlook paint. It's useful everywhere. And it's fairly cheap and easy. Consider painting the cupboards, an accent wall, the ceiling, or a door. Do not be scared of color. Let your personality shine through, and don't worry about what anyone else thinks. You live in your house, not your mother-in-law (hopefully.)

Rugs are also cheap, and can make an impact. Old rugs are useful, too. Try putting one under the trash can in the cupboard. Then, if there is any kind of mess, you simply shake it outside, or throw it in the washing machine, rather than scrubbing the bottom of the cupboard.
Try making your own backsplash.Visit hgtv for the how-to of the one above. (It's paper!)
This is Sara's. Love it.

Another Idea: Special Treats
Decorate the insides of cupboards. Sometimes a special hidden treat can be a real smile-inducer. I've decoupaged the inside of my cupboard doors with my favorite scrapbook papers,
Bible verses, and paintings.Visit this site for more ideas and their instructions.

Line the inside of drawers with place mats, pretty liner, wallpaper, scrapbook paper. You can decoupage them, or use contact paper. Or, for a less permanent idea, put your favorite paper down and then cut a clear placemat to fit on top. This is also good for those of you who like to change things around often. The Dollar Tree carries shelf liner, but it's even cheaper at auctions, yard sales, or thrift stores. I bought an entire roll for a quarter.
More to come...